
LED strip lights can be shortened for cabinets, shelves, ceilings, stairs, display cases, and other linear lighting applications. However, they cannot be cut at any random position. Each strip has designated cutting points based on its circuit design.
A clean cut at the correct mark allows the remaining section to continue working. A cut through an LED chip, resistor, or circuit path may permanently damage that part of the strip.
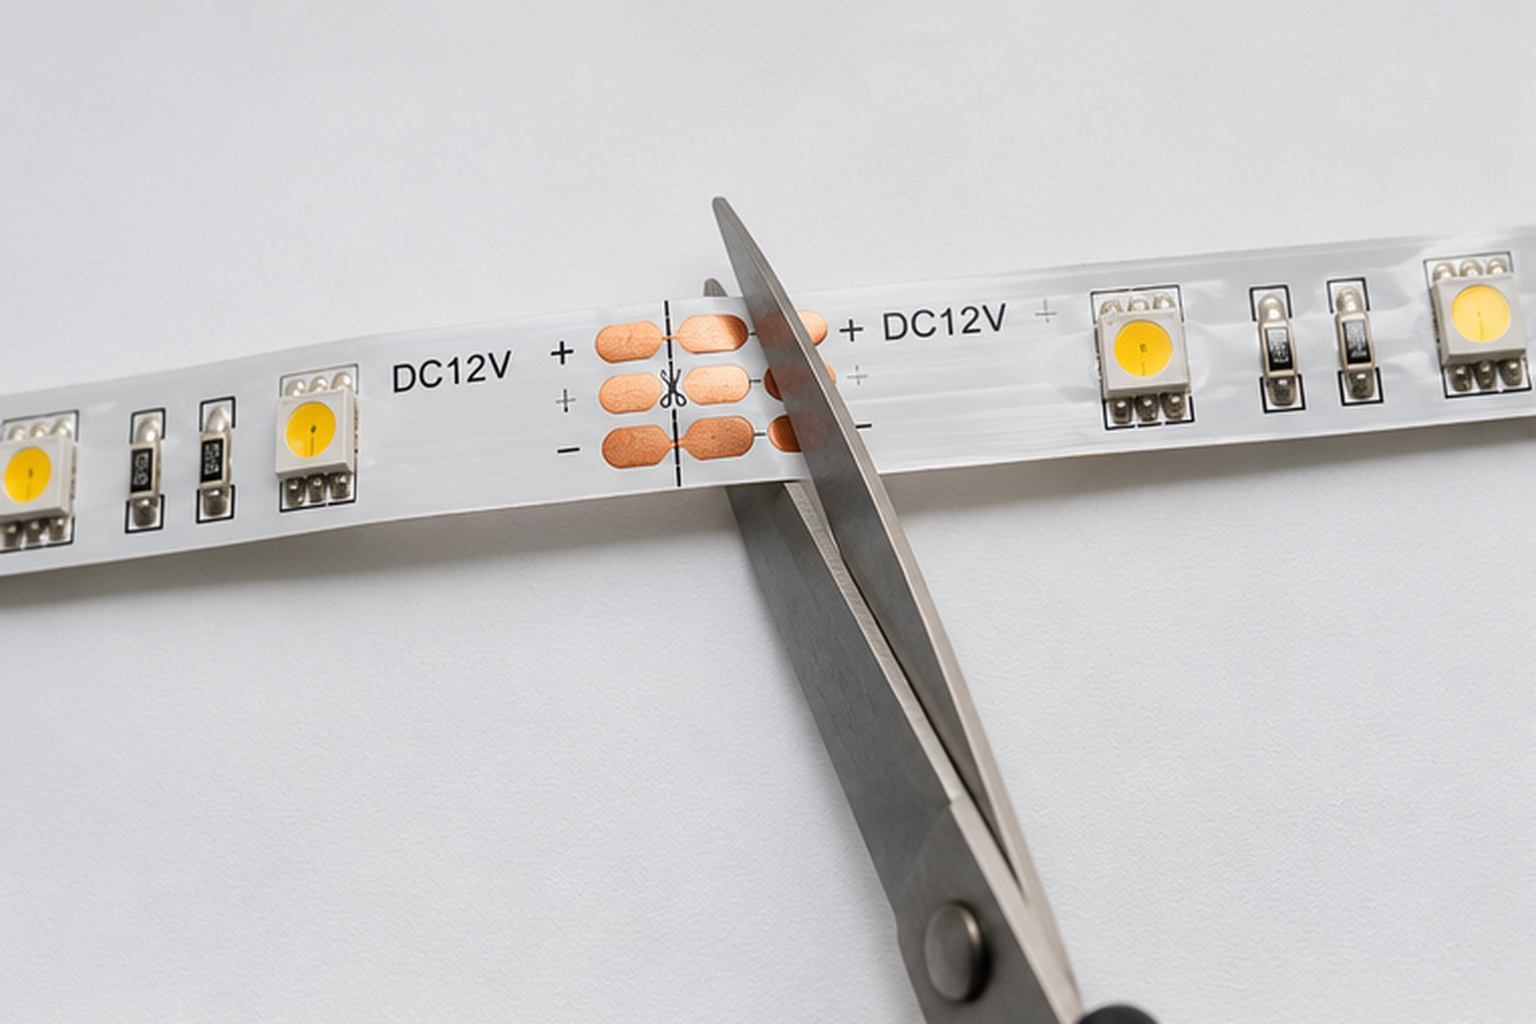
Before using scissors, identify the strip voltage, width, cutting interval, number of electrical contacts, and whether it has a waterproof coating. These details affect how the strip should be cut and reconnected.
Most cuttable LED strips have a scissors symbol or a printed line across exposed copper pads. The strip should only be cut directly through this marked area.
LEDVANCE advises measuring the required length, finding the cut mark, and using sharp scissors to cut exactly along the indicated line so the circuit is not damaged.
Measure the actual lighting position before cutting. When the strip will be installed inside an LED Aluminum Channel, also allow room for end caps, wire outlets, connectors, and corner accessories.
The usable internal length may be slightly shorter than the total profile length after accessories are installed.
The strip must be disconnected from its power supply before cutting. Do not cut, solder, or adjust the strip while it is energized.
This protects the installer and reduces the chance of short circuits or damage to the strip, driver, or controller.
The goal is to create a straight edge while keeping enough copper contact area for the next connection.
Place the strip on a clean, flat surface and cut through the center of the marked line. Avoid angled cuts because they can remove part of the copper pad.
Do not fold, twist, or sharply bend the strip during the process. LEDVANCE installation guidance also warns against folding, bending, or twisting flexible LED strips during handling.
After cutting, check that the copper pads remain clean and complete. Damaged or uneven pads may make it difficult to attach wires or solderless connectors.
For coated or waterproof strips, the outer protective layer may need to be removed carefully before making a connection.
Connect the cut strip to a compatible driver and test it before installing the diffuser or sealing the profile.
Confirm that all LEDs illuminate normally and that there is no flickering, unusual heat, or loose connection.
A cut section can often be reused when it contains complete copper pads and is connected to a suitable power supply.
Solderless connectors can simplify installation, but the connector must match the strip width and number of contacts.
Single-color, tunable-white, RGB, and RGBW strips use different contact arrangements. A connector intended for one strip type may not work with another.
Wires may also be soldered directly to the copper pads. Polarity must be matched correctly, and excessive heat should be avoided.
A soldered joint should be insulated and protected after testing, particularly in humid or frequently cleaned environments.
Cutting a waterproof strip opens its original protective layer. The new end or joint may require suitable sealing material.
The completed assembly should only be treated as water-resistant when the strip, connector, cable entry, end seal, profile, and installation method are all designed for the intended environment.
An aluminum channel gives the cut strip a defined mounting position and helps create a more finished lighting result.
A diffuser can soften the appearance of individual LED points. The result depends on the channel depth, diffuser opacity, LED density, and distance between the strip and cover.
Deeper profiles and higher-density strips generally provide more room to create a continuous-looking light line.
The channel helps protect the strip from light impact, direct contact, dust, and movement during cleaning.
This is useful in cabinets, retail displays, wardrobes, hotels, offices, and furniture where exposed tape may be touched frequently.
Aluminum provides a heat-transfer path away from the LED strip when the tape is fitted correctly against the profile.
Our LED Aluminium Profiles are designed for strip mounting, protection, heat dissipation, and cleaner lighting integration. Available forms include surface-mounted, recessed, corner, and suspended profiles with customizable dimensions, finishes, colors, and diffusers.
Our factory provides aluminum extrusion, cutting, machining, surface treatment, assembly, and packaging support for standard and customized profile projects.
Buyers can provide the strip width, power, required profile shape, diffuser preference, installation drawing, and expected quantity.
This information helps confirm whether there is enough internal space for the strip, wiring, connector, and thermal requirements.
Profiles can be discussed according to cross-section, length, color, anodized finish, powder coating, brushed surface, or other project requirements.
OEM and ODM development can be based on drawings, samples, or functional requirements.
The factory uses extrusion, aging, and surface-treatment equipment to support profile strength, dimensional stability, and finish consistency. Its official factory information lists 12 extrusion machines, two aging furnaces, and vertical and horizontal powder-coating lines.
Do not cut outside the marked line, connect the wrong polarity, force an oversized strip into the profile, or close the diffuser before testing.
For long lighting runs, the installer should also check voltage drop, driver capacity, cable size, controller load, and power-injection positions.
Preparing a cabinet, ceiling, retail-display, furniture, or architectural lighting project? Send us your LED strip width, required profile type, diffuser preference, finish, length, quantity, and project drawing. We will review the specifications and prepare a suitable led aluminum channel quotation.